

Kisspeptin 10 for Sale Research Guide for Labs
A researcher searching “kisspeptin 10 for sale” may expect a straightforward catalog result. Instead, the

Most advice on how to mix Melanotan 2 stops at “add water and swirl.” That advice is incomplete. The volume you choose changes the final mg/mL concentration, the size of each measurable draw, and how much room you have for dosing error when you're working with a U-100 insulin syringe.
Reconstitution is a measurement problem, not just a mixing step. A 10 mg vial mixed with 2 mL of bacteriostatic water gives 5 mg/mL, while 5 mL gives 2 mg/mL. Those are not interchangeable choices, because the concentration you create determines whether a small dose is easy to measure or annoyingly imprecise.
The common framing is too simple. Many guides treat reconstitution like a quick rinse of powder into solution, but the critical decision happens before the syringe ever touches the vial. The diluent volume you pick sets the final concentration, and that concentration controls how much precision you can realistically get from a U-100 barrel.
A lot of users want a single “correct” mixing ratio. There isn't one. A widely used convention is 10 mg + 2 mL, which yields 5 mg/mL, but other peptide-research guides also use 10 mg + 5 mL for 2 mg/mL because smaller doses are easier to read on insulin syringes when the solution is less concentrated. That trade-off is the core issue, not whether the powder dissolved.
Practical rule: Choose the dilution that makes your target dose easiest to measure cleanly, not the dilution that sounds simplest.
The missing piece in most guides is measurement error. If your protocol uses small increments, a concentrated vial can force you into tiny volume draws that are harder to reproduce accurately. If you dilute more, the dose becomes easier to see on the syringe, but the vial now requires a larger total volume, which can change how many punctures you'll need and how you'll label the vial afterward.
That's why how to mix Melanotan 2 should be approached like a calibration step. The point isn't just to make a clear solution. The point is to make a solution whose concentration matches the dosing range you intend to use, with the least ambiguity possible.
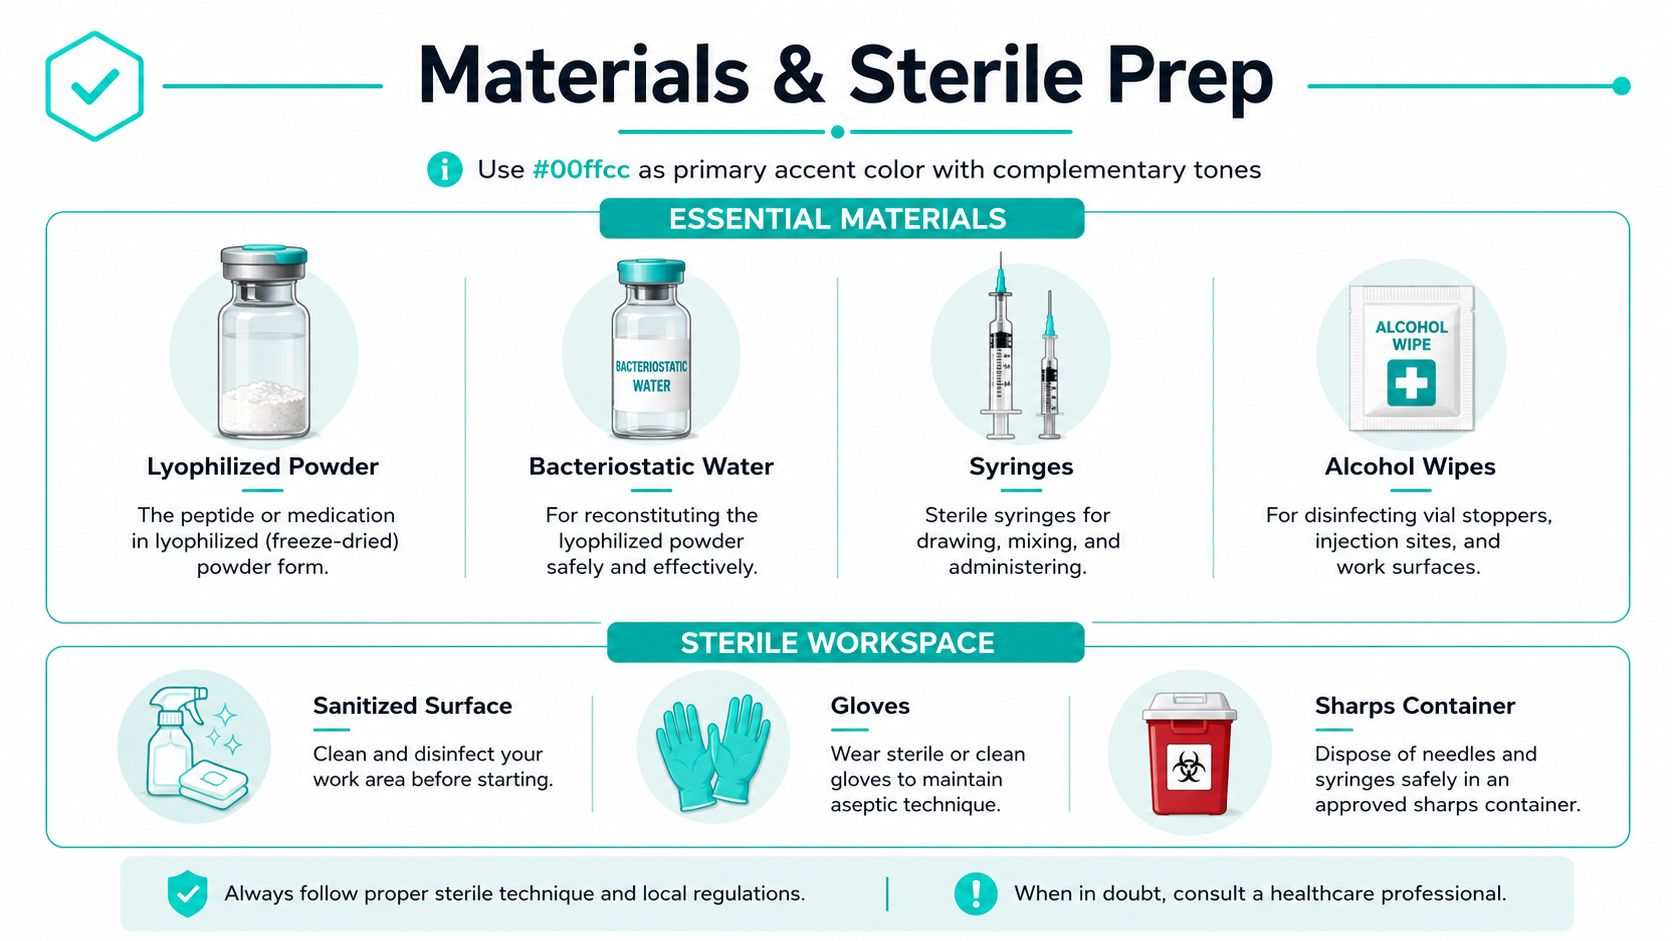
Set everything out before you open a vial. You need a lyophilized Melanotan 2 vial, bacteriostatic water, a U-100 insulin syringe for dosing, a larger sterile syringe for transferring diluent if needed, and fresh alcohol prep pads. A clean work surface matters just as much as the tools, because every extra touch point adds contamination risk.
Bacteriostatic water is the standard diluent in peptide-research guides because it contains 0.9% benzyl alcohol, which acts as a preservative for multi-use handling over time. The reason this matters is simple, once the vial is punctured, you're no longer working with a sealed powder. You're managing an aqueous solution that needs better handling discipline.
Keep all materials within arm's reach before you start. Moving back and forth across the room is how people break sterile flow and touch surfaces they already disinfected.
Check the vial before you do anything else. The powder should look like an intact lyophilized cake, and the bacteriostatic water vial should be within its expiration date. If the vial is cracked, the stopper looks damaged, or the contents already look off, stop there.
A clean workspace is not a dramatic setup. Wash your hands, disinfect the surface, and let the alcohol dry. If you're looking for one practical vendor-side reference point in the same workflow, Celonyx Labs publishes a peptide catalog and support pages for research use, but the sterile technique still has to be executed correctly at the bench.
The math is the part that keeps the whole process honest. If you know the vial mass and the diluent volume, you know the concentration. If you know the concentration, you know what each syringe mark means in peptide mass.
Here are the two common benchmarks from the verified data. A 10 mg vial + 2 mL of bacteriostatic water yields 5 mg/mL. A 10 mg vial + 5 mL yields 2 mg/mL. The lower-concentration vial is easier to measure for smaller draws, while the higher-concentration vial gives you more peptide per unit volume.
A 0.1 mL draw at 5 mg/mL delivers 0.5 mg of Melanotan 2, which is why that ratio gets repeated so often in practical guides. At 2 mg/mL, the same 0.1 mL contains 0.2 mg. Those are very different doses, so you can't move between ratios casually and assume the syringe mark still means the same thing.
| Syringe Volume (mL) | Units on U-100 | Dose at 5 mg/mL (mg) | Dose at 2 mg/mL (mg) |
|---|---|---|---|
| 0.1 | 10 | 0.5 | 0.2 |
| 0.2 | 20 | 1.0 | 0.4 |
| 0.3 | 30 | 1.5 | 0.6 |
| 0.4 | 40 | 2.0 | 0.8 |
| 0.5 | 50 | 2.5 | 1.0 |
The point of a table like this is not to encourage memorization. It's to prevent you from assuming that “ten units” means the same thing across every reconstitution. It doesn't.
If you want to verify syringe math against a different target concentration before you mix, use a dedicated calculator like this peptide dosing tool and then label the vial based on the final concentration, not the starting peptide mass.
A more diluted vial can reduce measurement ambiguity when your intended draw is small. A more concentrated vial can be workable when your protocol uses larger draws and you want fewer total mL in the vial. The right choice depends on the dose range you need to read reliably.
The loading and maintenance references in the verified data also show why concentration planning matters. Published protocols commonly describe a 0.25 mg daily loading phase for 7 to 14 days, with some increasing to 0.5 mg if tolerated, followed by 0.5 mg once or twice weekly for maintenance. A vial that is easy to read for one part of that workflow may be awkward for another.
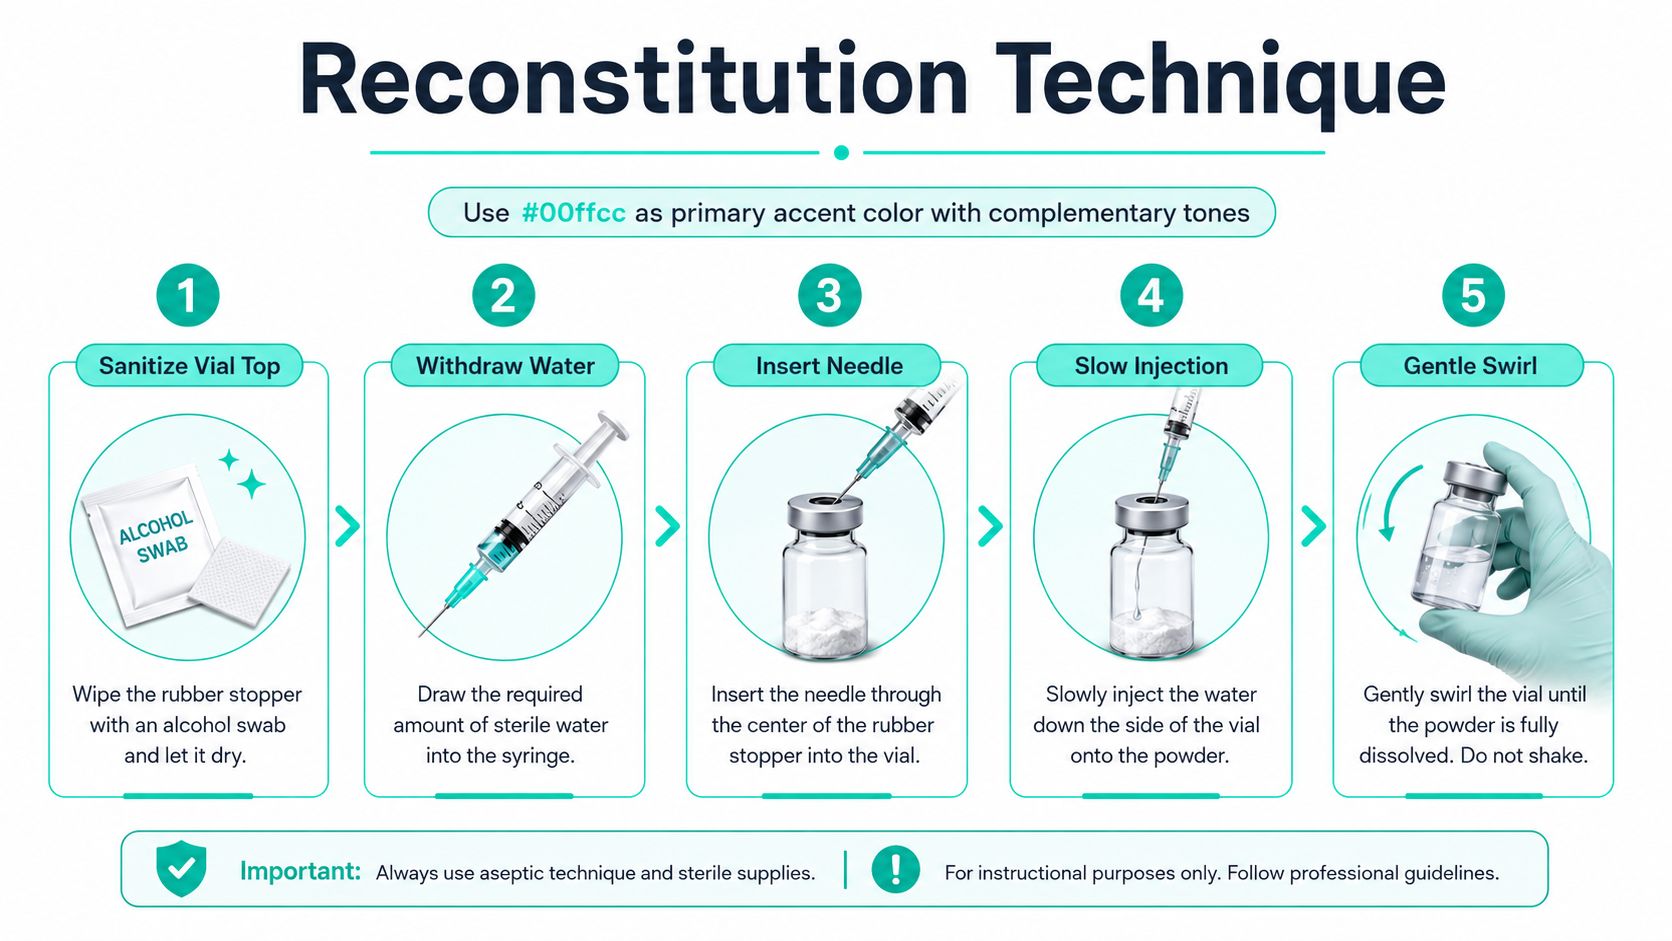
Start by wiping both vial stoppers with alcohol and letting them dry. That sounds routine, but rushing the dry time is a common mistake because wet alcohol can carry contaminants across the rubber surface. Use a fresh syringe, draw the exact volume of bacteriostatic water you decided on, and remove any obvious air bubbles before you puncture the peptide vial.
The critical move is where the water goes. Guide the needle so the water runs down the inside wall of the vial, not directly onto the powder. The verified data are clear on this point, water added too forcefully can create foam and measurement error, and practical guides also warn that shaking is the wrong response.
The safest visual target is a clear solution without foam or suspended material. If you're forcing the mix, you're probably creating a measurement problem.
A practical reconstitution guide also recommends refrigeration at 2 to 8 °C after mixing and use within 28 days. If you want a procedural reference point for the workflow, the internal guide at Celonyx Labs' reconstitution page is the kind of resource researchers often keep nearby while working.
For a visual walk-through of the handling sequence, the embedded video below is worth watching before you start mixing for the first time.
Once the powder is dissolved, your job changes from mixing to preservation. The verified storage guidance puts the vial in the refrigerator at 2 to 8 °C, and the common use window after reconstitution is 28 days in one practical protocol. That is a handling window, not a challenge to stretch longer because the solution still looks fine.
Label the vial immediately with the reconstitution date and the final concentration. If you mix one vial at 5 mg/mL and another at 2 mg/mL, those numbers need to be visible at a glance because dose math changes completely between them. A mislabeled vial is worse than an empty one, because it makes every later draw suspect.
The key handling rule is consistency. Keep the vial protected from light, avoid unnecessary punctures, and use a fresh syringe for each withdrawal. Those steps matter because the longer a vial stays in circulation, the more chances there are to introduce contamination or lose track of the actual concentration being used.
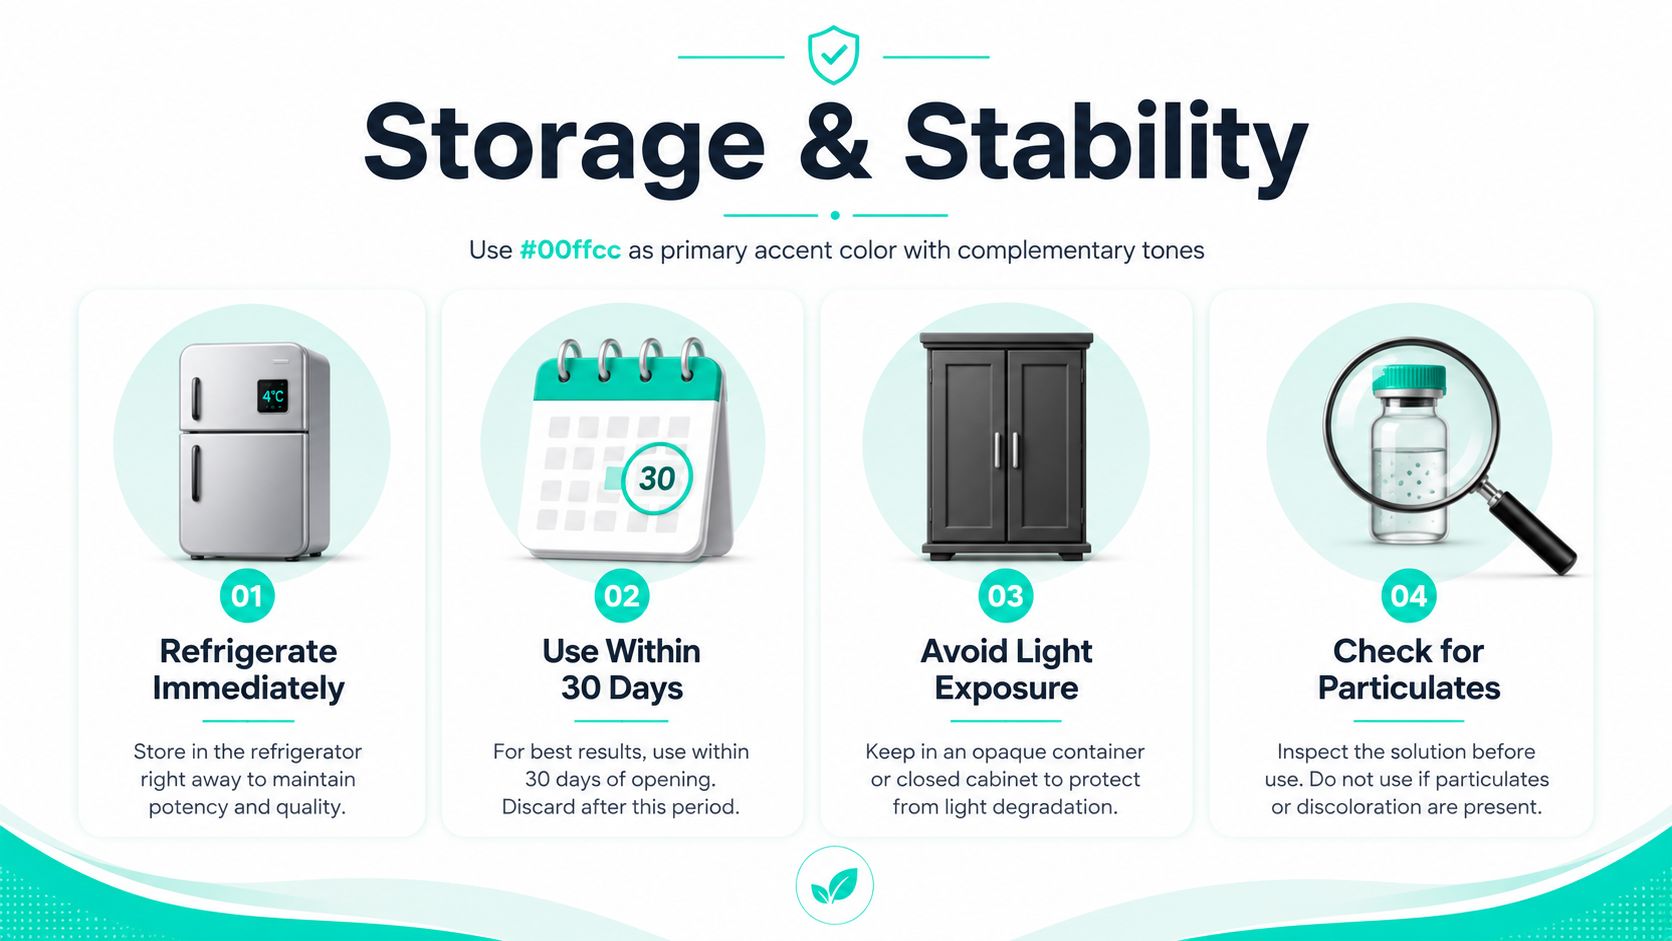
A good solution stays clear. If you later see particles, sediment, or cloudiness, treat that as a handling failure until proven otherwise. Light exposure, temperature swings, and repeated punctures all make storage less reliable, even when the initial mix was clean.
A practical storage reference at Celonyx Labs' peptide storage page fits the same workflow, but the principle is simple enough without it. Refrigerate promptly, record the concentration, and do not use a vial whose appearance has changed.
A cloudy vial is the easiest problem to spot and the hardest one to ignore. If the solution turns cloudy right after mixing, the first questions are whether the water was added too aggressively, whether the vial was shaken, or whether the starting material was already compromised. If cloudiness develops later in storage, think contamination or temperature handling first.
Visible particles are different from cloudiness. Particulates that don't dissolve may point to a bad starting vial or a contamination event during transfer. In either case, the safest move is to stop using the vial rather than trying to salvage a questionable solution.
One useful habit is to separate visual problems from math problems. If the vial looks fine but the dose feels “wrong,” recheck the concentration label, the syringe reading, and the dilution ratio before assuming the product is bad. A lot of avoidable errors start with someone drawing from the wrong mental model of what the vial contains.
If the solution is cloudy, discolored, or full of debris, discard it. If the only issue is confusion about what a mark on the syringe means at a different dilution, recalculate from the actual concentration instead of guessing. That distinction saves time and keeps one mistake from turning into a chain of bad draws.
Celonyx Labs supplies research peptides, including Melanotan 2, along with catalog support, product documentation, and ordering tools that fit laboratory workflows. If you need a research vendor while you're planning concentration, storage, or reconstitution details, visit Celonyx Labs and review the product and support information before you place an order.
A researcher searching “kisspeptin 10 for sale” may expect a straightforward catalog result. Instead, the

Ranked guide to the best tirzepatide peptides for research in 2026: lyophilized vials, reference standards,

The best cagrilintide peptides for research in 2026, ranked by purity, COA availability, and format
FOR RESEARCH USE ONLY. Products sold by Celonyx Labs are intended exclusively for laboratory and scientific research. They are not intended for human or veterinary use, consumption, diagnosis, treatment, cure, or prevention of any disease. By purchasing from this site, you acknowledge that you understand the intended research purpose of these materials and agree to comply with all applicable laws and regulations.