

Peptide Calculator: Accurate Dosing Tool for Research in 2026
Stop guessing your peptide doses. Use our free peptide calculator to convert mg, mcg, and

You're standing at the bench with a fresh vial of lyophilized peptide, a sterile syringe, and a protocol that states “reconstitute and use.” That's where many experiments start to drift off course. Peptide reconstitution looks simple until a vial turns cloudy, the solution foams, or yesterday's clean stock gives inconsistent behavior in today's assay.
In practice, this step isn't clerical. It's one of the main control points in peptide handling. A peptide can arrive as a well-characterized powder, but the moment you move it into solution, you take responsibility for concentration accuracy, solubility, structural stability, and the handling record that supports your downstream data. That matters even more in a field where therapeutic peptide drugs expanded at a 12.4% compound annual growth rate between 2017 and 2024, with sales projected to surpass $50 billion by 2024, and where improper handling at room temperature for more than 4 hours can accelerate degradation, as summarized in this market and handling overview.
Most failed peptide experiments don't begin with dramatic contamination or an instrument fault. They begin with small handling errors that feel harmless in the moment. Cold solvent goes into a cold vial. The syringe stream hits the pellet directly. Someone shakes the vial because the powder “isn't dissolving fast enough.” The peptide dissolves, but not cleanly, not completely, and not in a way you can trust.
That's why peptide reconstitution has to be treated as a controlled protocol rather than a casual prep step. Once the powder enters solution, you're managing a more fragile state. Solubility, aggregation risk, adsorption to surfaces, and storage discipline all become part of data quality.
Practical rule: If you can't describe exactly how a peptide was reconstituted, you can't fully defend the result that came from it.
This matters beyond bench neatness. Peptide work now sits inside high-value research and therapeutic programs, and the field's commercial growth reflects how much depends on reliable preparation. A peptide that starts as a highly pure lyophilized material can still become a poor reagent if the solution is prepared badly.
New researchers often assume the difficult part is choosing the peptide. Experienced labs know the difficult part is making sure every vial is handled the same way, every time. Reproducibility begins before the first dose is drawn, before the first well is plated, and before the first instrument run is started.
A rushed setup causes most avoidable mistakes. Before you puncture a stopper, assemble the materials, confirm the target concentration, and decide what solvent you'll use if the first-choice solvent fails.
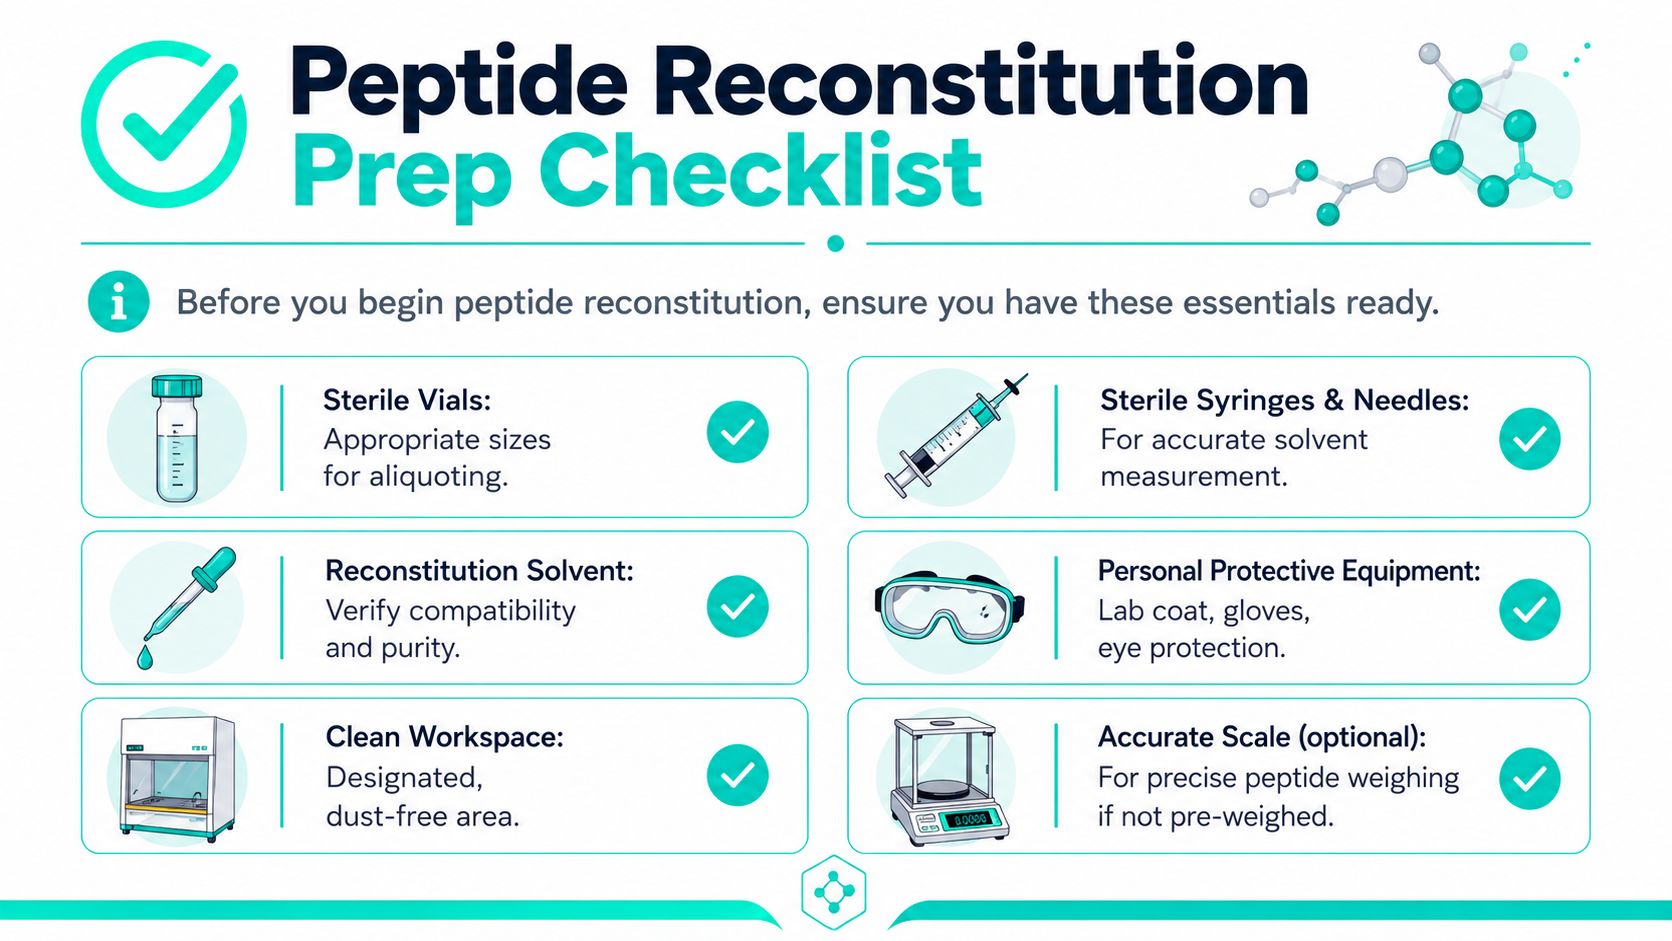
Use a clean, designated workspace. At minimum, have the peptide vial, solvent vial, sterile syringes and needles, alcohol wipes, gloves, eye protection, and labeled sterile aliquot tubes ready. If the peptide is not pre-weighed, confirm mass before you begin. If you'll split into aliquots, pre-label those tubes first. Don't rely on memory after the solution is made.
The most commonly skipped preparation step is temperature equilibration. If the peptide or solvent is too cold, dissolution may look slow, uneven, or falsely complete while aggregation is already starting. A 2025 analysis reported that reconstituting peptides below 15°C can cause a 25% to 30% increase in aggregation, and it identified 15 to 20 minutes of controlled warming as necessary for proper solvent-peptide interaction in temperature-sensitive handling workflows, according to this peptide stability discussion.
That means both components should reach a stable working temperature before mixing. Don't warm aggressively. Don't set the vial near a heat block. Let it equilibrate under controlled room conditions.
Many labs default to bacteriostatic water because it's familiar and broadly useful. That's reasonable for standard peptides, but it shouldn't become automatic. Solvent choice depends on peptide chemistry, intended concentration, and what the solution needs to do next. A peptide heading into a biochemical assay may tolerate a different solvent path than one going into a sensitive cell-based system.
Here's a practical comparison:
| Solvent | Best For | Notes / Precautions |
|---|---|---|
| Sterile water | Straightforward peptides with good aqueous solubility | Simple option for many routine preparations. Watch for incomplete dissolution in hydrophobic sequences. |
| Bacteriostatic water | Standard stock preparation when compatible with the workflow | Common first-line choice. Add gently and evaluate clarity before assuming success. |
| Dilute acetic acid | Peptides that resist dissolution in water alone | Useful escalation strategy for difficult sequences. Keep downstream assay compatibility in mind. |
A few bench habits make a real difference:
A clean setup is part of the chemistry. Good reconstitution starts before solvent touches powder.
This is the procedure I expect a new researcher to follow for a standard peptide that doesn't have known solubility issues. The goal isn't just to dissolve the powder. The goal is to obtain a clear, uniform solution with minimal physical stress.
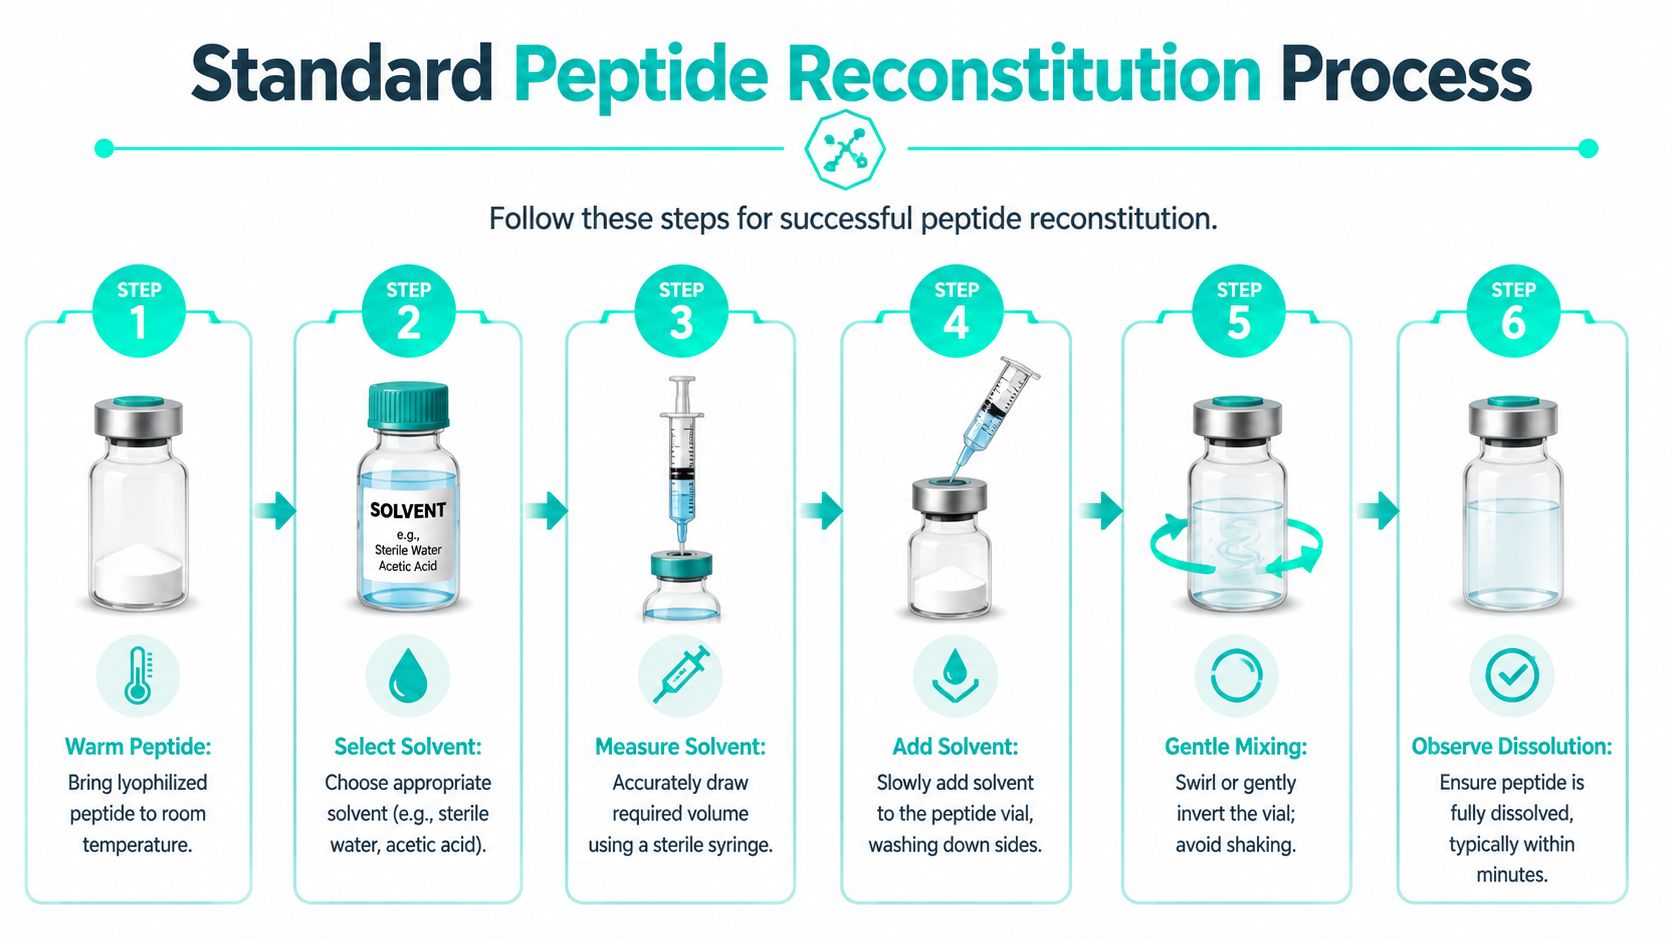
Start with the concentration you need in the stock, then work backward to the solvent volume. If you have a 1 mg vial and want a 1 mg/mL stock, add 1 mL of solvent. If you want a more concentrated stock, reduce the volume accordingly. Write the calculation down before drawing anything into the syringe.
This sounds obvious, but calculation errors are common when people work too fast or convert between mass and volume in their heads. The disciplined approach is simple:
If the resulting volume is impractically small, reconsider the stock concentration. Extremely small additions are harder to deliver consistently and make dissolution less forgiving.
The most important physical technique in peptide reconstitution is how you add the solvent. Don't spray the solvent directly onto the lyophilized pellet. Add it slowly down the inner wall of the vial so it trickles along the glass and reaches the powder gently. Protocols describing this wall-flow method report a success rate exceeding 95% for achieving a clear solution within 1 to 5 minutes, while direct spraying is associated with a 15% to 30% increase in aggregation and denaturation due to foaming and physical stress, as detailed in this peptide reconstitution protocol reference.
That difference is not cosmetic. Direct impact creates bubbles, traps air, and mechanically stresses the peptide at the air-liquid interface. If the sequence is large, hydrophobic, or already aggregation-prone, you've created a problem before mixing even begins.
Use this bench sequence:
A short visual guide can help if you're training someone new:
Once the solvent is in, mix gently. Swirl the vial or roll it slowly between your palms. Never shake it hard. The aim is to encourage full contact between solvent and powder without creating foam. For standard peptides, complete dissolution should produce a clear, particle-free solution.
If material remains after a few minutes, don't escalate immediately to rough handling. First inspect what you're seeing. A few flecks on the glass may mean the pellet hasn't fully wetted. A cloudy suspension suggests a real solubility problem or aggregation event.
Use these cues:
If you're tempted to shake the vial, stop. Shaking usually gives the illusion of progress while making the sample worse.
One more practical point: avoid dragging the process out at room temperature. Once reconstituted, move the solution toward its planned storage or use path promptly. Lingering on the bench while you label tubes, answer messages, or set up the next task is how good material starts to deteriorate.
Some peptides don't respond to the standard playbook. They don't dissolve cleanly in water, they leave haze in the vial, or they form films and particulates that persist despite careful technique. Treating those peptides like “normal” peptides is one of the fastest ways to waste both material and time.
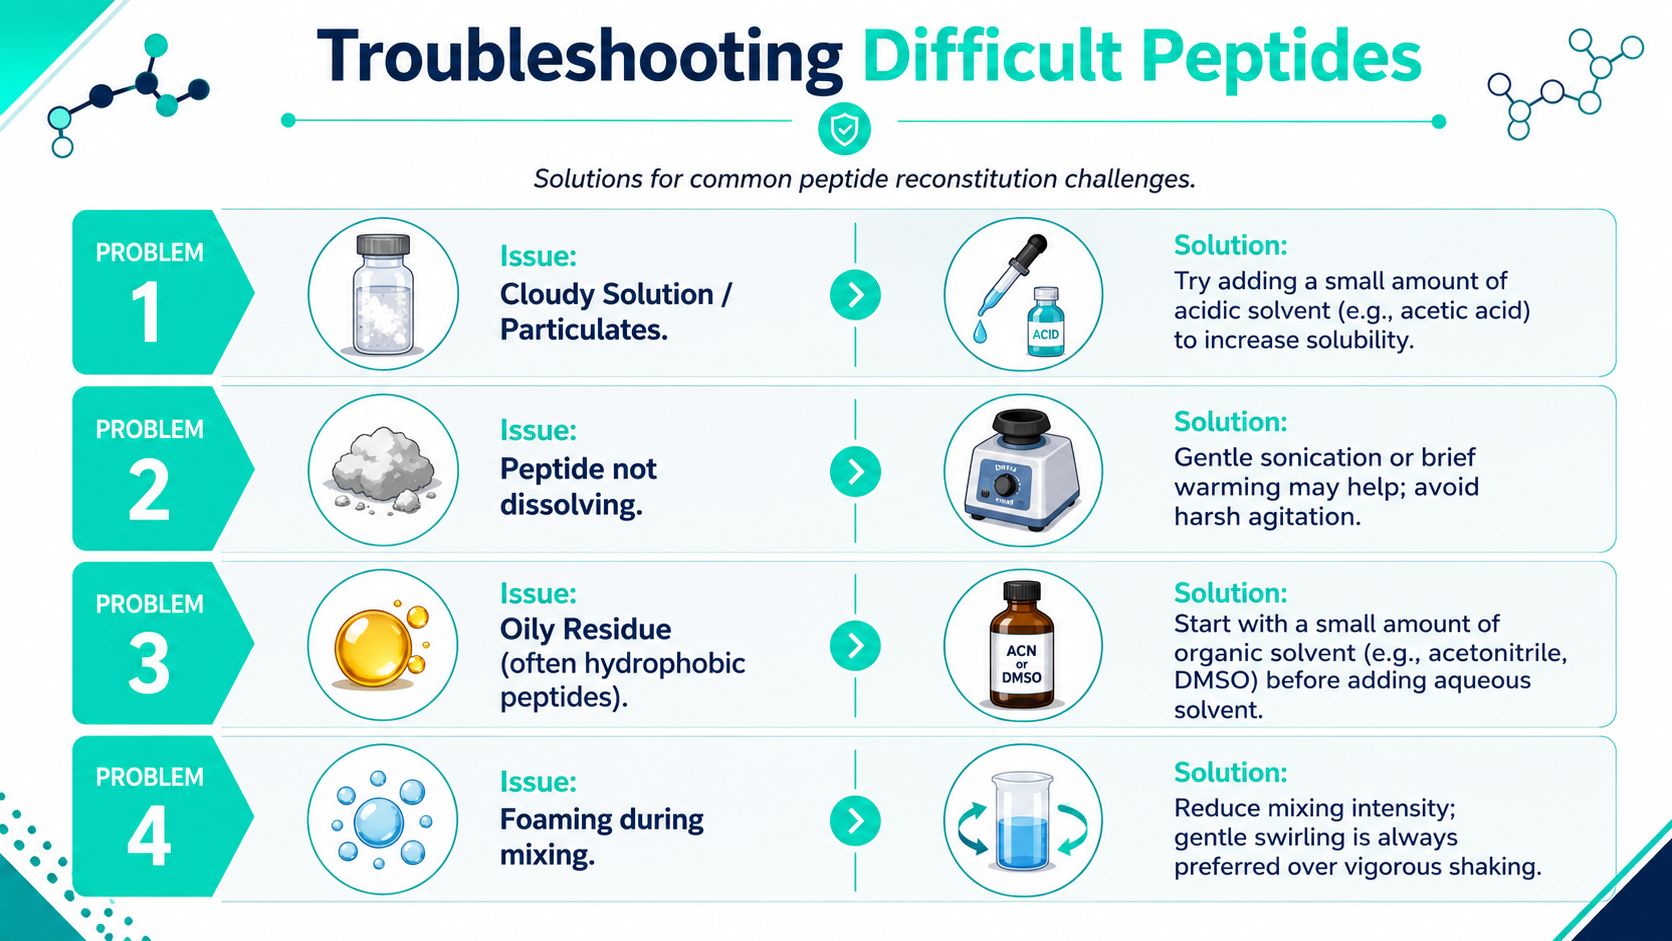
Independent protocol data indicates that 15% to 20% of research peptides, particularly hydrophobic ones, require co-solvents such as DMSO at 1% to 5% or brief sonication for 30 to 60 seconds to achieve complete dissolution, according to this report on peptide vial preparation and concentration.
That aligns with bench experience. Hydrophobic peptides often don't fail because the operator was careless. They fail because the default solvent isn't strong enough to disrupt the peptide's tendency to self-associate or cling to surfaces. When that happens, more swirling with the same solvent rarely fixes the root problem.
Cloudiness is the first warning sign. Persistent fine particles are the second. An oily sheen or residue along the vial wall often points to a peptide that needs a different solvent strategy.
Don't jump randomly between methods. Use a controlled escalation so you know what changed and what solved the problem.
Important trade-offs matter here:
A few practical constraints keep this from becoming guesswork:
Cloudy doesn't mean “close enough.” In peptide work, visual compromise often becomes analytical compromise later.
If a peptide only dissolves under conditions that make the downstream experiment questionable, the honest decision may be to redesign the prep rather than force the assay forward. Salvaging material is useful. Salvaging bad assumptions is not.
A peptide that dissolved perfectly can still become unreliable if you store it badly. Most handling damage after reconstitution comes from repeated vial access, repeated temperature cycling, and vague labeling.
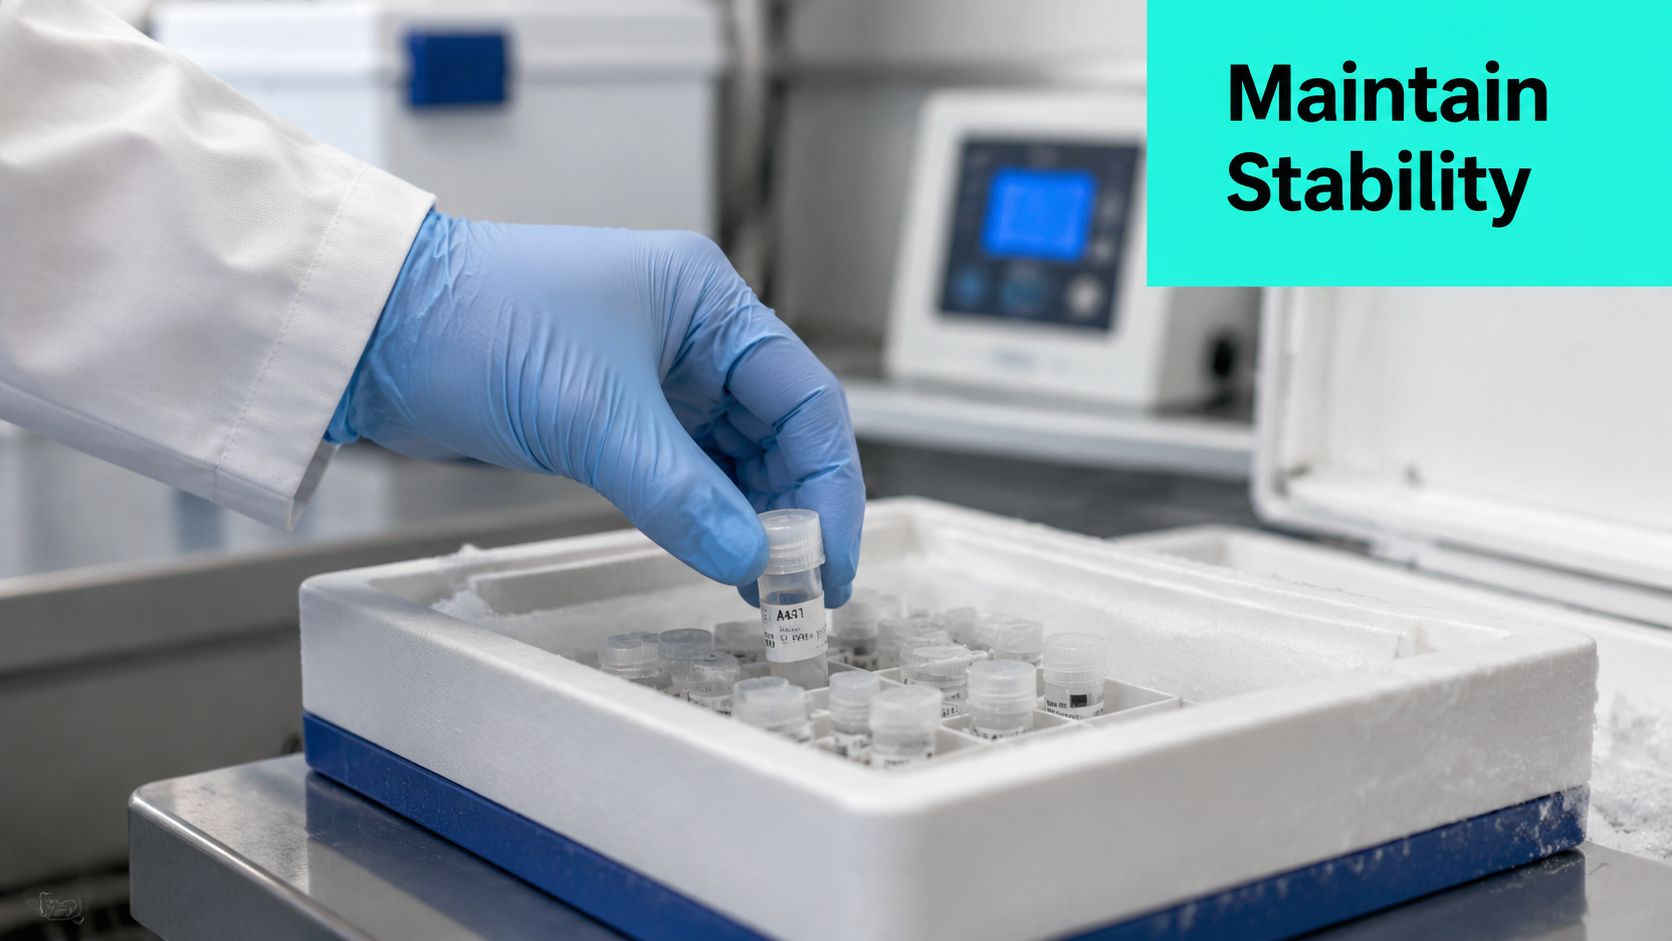
As soon as the solution is confirmed clear, split it into practical working aliquots. The right aliquot size is the amount you'll realistically use in a single experiment or a tightly grouped set of runs. The point is to avoid reopening the same stock tube repeatedly.
Aliquoting protects the solution from avoidable handling stress. It also prevents a common lab failure mode where one person uses the stock, leaves it out too long, then returns it to cold storage without anyone else knowing what happened.
Label each aliquot clearly. At minimum, include:
Reconstituted peptides typically maintain greater than 99% purity for 21 to 28 days when stored at 2°C to 8°C, while lyophilized peptides can remain stable for up to 24 months at -20°C or -80°C before reconstitution, according to this peptide stability summary.
That contrast tells you exactly where the risk sits. The powder is comparatively forgiving. The solution is not. Once the vial is reconstituted, the clock starts, and temperature control becomes part of assay quality.
Use a simple storage policy:
| Material state | Preferred handling |
|---|---|
| Lyophilized powder | Keep cold and dry until you're ready to prepare the stock |
| Reconstituted stock for near-term use | Refrigerate consistently and minimize vial access |
| Long-running projects | Prepare single-use or low-use aliquots instead of one master solution |
A few habits matter more than people expect:
Good storage doesn't rescue a bad reconstitution. But poor storage can absolutely ruin a good one.
If your lab treats peptide reconstitution as a hand skill without a paper trail, troubleshooting becomes guesswork. Documentation is what turns a technique into a reproducible process.
Every reconstituted peptide should have a corresponding record. It doesn't need to be elaborate. A spreadsheet, ELN entry, or printed batch log works if people put it into practice. What matters is that the same information is captured every time.
A useful reconstitution log includes:
If your vendor provides a Certificate of Analysis, keep that document linked to the lot in your records. This is especially important when the supplier states high purity and independent third-party testing. Those documents support traceability, and they give you a starting point if a result later looks inconsistent.
The vial label tells you what you bought. The reconstitution log tells you what you actually used.
When an assay drifts, most labs first suspect the instrument, the cells, or the analyst. Often the actual issue is upstream. The peptide may have been prepared at the wrong concentration, exposed too long at the bench, or salvaged with a solvent that altered downstream behavior.
A proper record lets you ask useful questions:
This is also where batch-linked documentation supports publication and internal review. If someone challenges an outlier result, you can show not just which peptide was used, but how it was prepared, when, by whom, and under what conditions.
Labs that document reconstitution well usually discover problems earlier. They also stop blaming biology for what is really a handling issue.
A fully reconstituted peptide solution should look clear and uniform when viewed against good light. A suspension often looks slightly hazy, shows drifting specks, or leaves residue that returns after gentle swirling. If the vial clears briefly and then visible material reappears, treat that as incomplete dissolution, not success.
Don't panic, but don't ignore it. Set the vial down and let any bubbles settle. Then inspect the solution carefully after gentle swirling. If it stays clear, you may still have a usable preparation. If foam, cloudiness, or persistent flecks appear, move into a documented troubleshooting pathway rather than trying to shake it into submission.
Calculate the stock concentration from the total peptide mass and the full solvent volume added to the vial. Aliquoting doesn't change concentration. It only divides the stock into smaller volumes. The key is to label each aliquot with the same concentration and enough identifying information that no one has to reconstruct the math later.
If your lab needs research peptides backed by stated 99% purity, independent third-party testing, and clear ordering support, Celonyx Labs is worth reviewing as a sourcing option. Strong peptide reconstitution begins with strong incoming material, and reliable vendor documentation makes your own QC and traceability much easier.
Created with Outrank app
Stop guessing your peptide doses. Use our free peptide calculator to convert mg, mcg, and

The most surprising fact about Retatrutide isn't that it causes large weight loss. It's that

You're probably in one of two situations right now. Either you've found a peptide you